In the previous CAP tutorial series on Creation of SAP Fiori Application with SAP CAP and SAP HANA Cloud, we created the SAP Fiori Full-Stack application with SAP CAP Model & HANA Cloud, wherein we learned to create the SAP Fiori Application from scratch in a step-by-step & detailed manner. However, the generated CAP Services and Fiori application are not secured and anyone can access them. In this CAP tutorial, we will add security to SAP Fiori Application with XSUAA and Approuter.
In this tutorial you will learn –
- Introduction to Approuter and Configure the Approuter
- Understanding xs-security.json file
- Introduction to XSUAA. Difference between Authentication & Authorization
- Adding XSUAA configuration
Let’s Add Security to SAP Fiori Application
Approuter (Application Router)
What is Approuter –
The Approuter (Application router) is the single point of entry for an application running in the Cloud Foundry Environment on SAP BTP.
In real-time, you might have an application that consists of different micro-services, and all those micro-services will have a different point of entry i.e. different URLs. As a backend resource, we will have access to those URLs, but when the end user is going to use the application, then we can’t give them multiple entry points and we need to create a single entry point for the end user to access all those microservices. And this single point-of-entry is provided by Approuter.
Uses of Approuter –
- Authenticate Users
- Rewrite URLs
- Serve Static Content
- Forward or Proxy Requests to other microservices with user info.
There are two types of Approuter –
- User-defined Approuter – Developer can create its own Approuter
- Managed Approuter – SAP provided Approuter
SAP recommends going with a User-defined Approuter only in advanced cases like when application router extensibility is required.
Managed Application Router –
The managed Approuter enables you to access and run HTML5 applications in a Cloud Foundry environment without the need to maintain your own runtime infrastructure.
To use the managed application router, we need to subscribe to one of these services under the BTP subaccount.
- SAP Build Work Zone, standard edition
- SAP Build Work Zone, advanced edition
- SAP Cloud Portal
Below are the steps to create a managed application router.
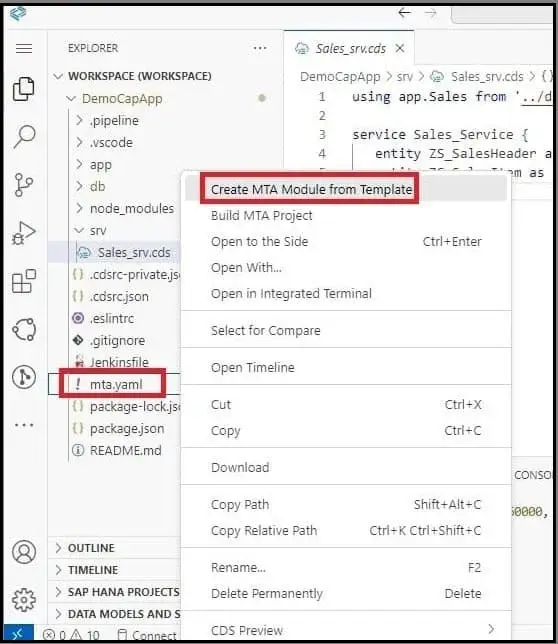
1) Right-click on mta.yaml and click on ‘Create MTA module from Template’.
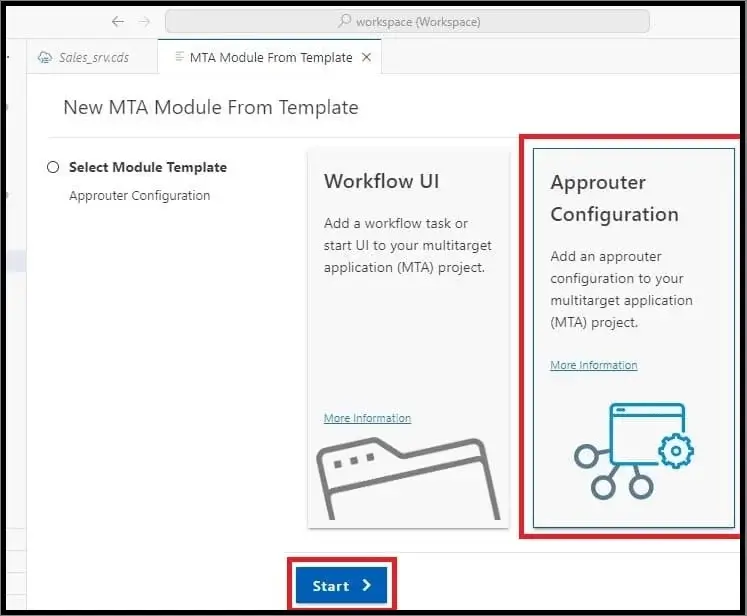
2) Select Approuter Configuration and click on ‘Start’.
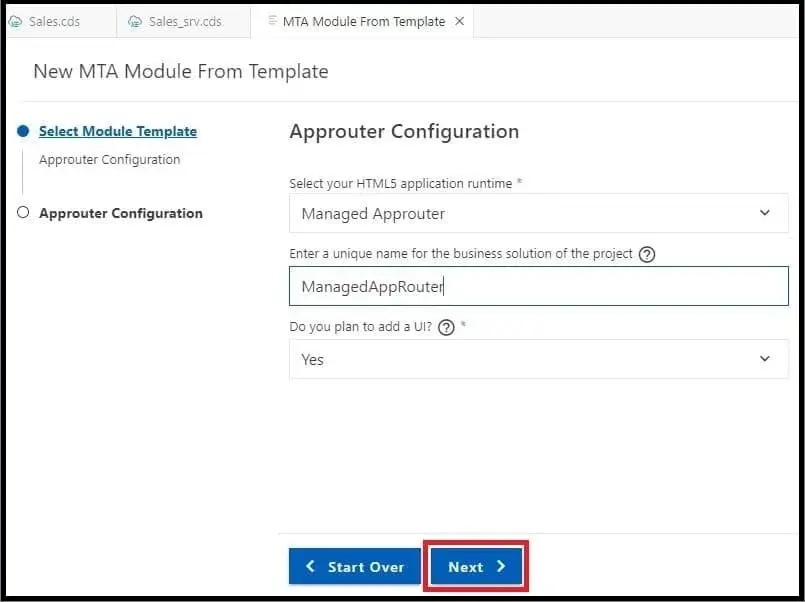
3) Select HTML5 application runtime as ‘Managed Approuter’ from the dropdown value. Enter any unique name for the business solution of the project.
For the question ‘Do you plan to add a UI’, select ‘Yes’ that will add the ‘html5-apps-repo’ required instance to the ‘mta.yaml’ file.
Click on ‘Next’.
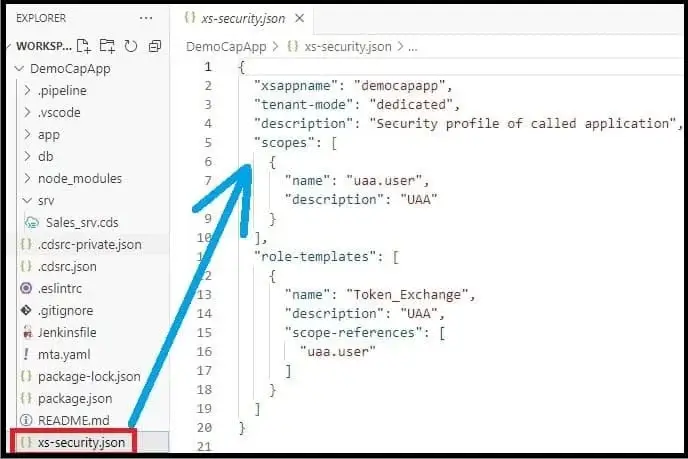
This process will generate – i) a new file xs-security.json in the root of the project and ii) Add new sections in mta.yaml file.
i) New file xs-security.json
xs-security.json file –
xs-security.json file (application security descriptor file) defines the security options i.e., details of the authentication methods and authorization types to use for access to your application.Contents of xs-security.json file –» Scopes – A list of limitations regarding privileges and permissions and the areas to which they apply.» Role templates – Details about roles to apply to a user.» Attributes – List of yet undefined details like name of country or cost center.
xs-security file declares the scopes and attributes on which to perform the security checks. Scope checks can be performed by the approuter and by the application itself. And checks using attribute values can be performed by the application and on the database level using the SAP HANA DCL.
Currently, inside scope, we have uaa.user, and inside the role template we have ‘Token Exchange’ i.e. we do not have any custom role. This means the user can access the application by generating the token and providing that token to the CAP service and UAA will provide the authentication to the user.
ii) Changes in mta.yaml file
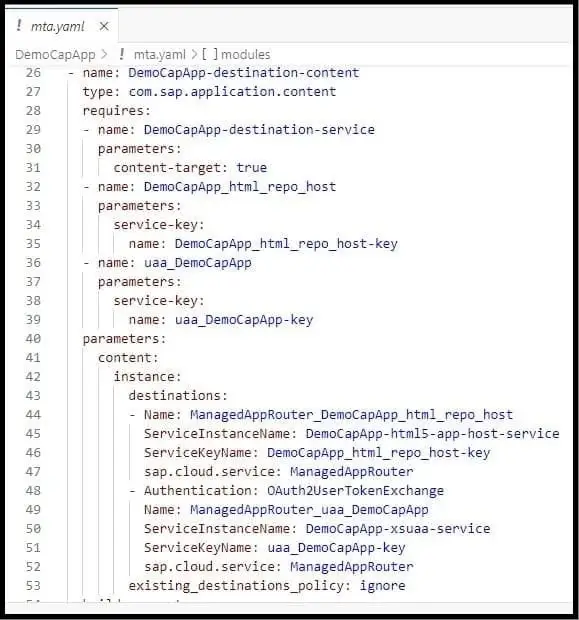
Creation of managed Approuter has added new modules and resources in the mta.yaml file.
a) Addition of new modules
b) Addition of new parameters
SAP Service Marketplace
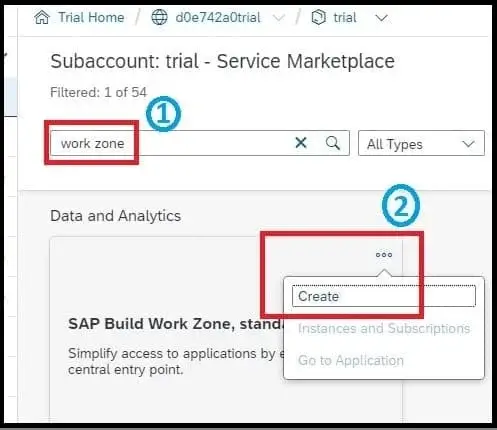
Now to subscribe to the SAP Build Work Zone service, navigate to the Service Marketplace under the BTP subaccount and search for ‘SAP Build Work Zone, standard edition’, and click on ‘Create’ ( In the trial account, only the standard edition is present).
Select the plan as ‘standard subscription’ and click on ‘Create’.
Authentication Vs Authorization
Below is the difference between Authentication and Authorization in SAP BTP.
Authentication –
Authentication verifies the user’s identity and the presented claims such as granted roles and tenant membership.
In short, Authentication provides access to the service. And to provide access to the service, you should know who is trying to access the service.
Authorization –
Authorization controls how the user can interact with the application’s resources according to the granted privileges.
For example – Let’s consider an application is accessed by user A and user B which means both user A and user B are authenticated. Now, user A can only READ and user B can READ and WRITE the application then it is called user A is authorized to READ and user B is authorized to READ & WRITE.
XSUAA Service
What is XSUAA ?
The full form of XSUAA is ‘XS User and Authentication and Authorization’. XSUAA is a cloud-based service that is used for authentication and authorization of applications and services running on the SAP BTP.
It is a full-fledged OAuth 2.0 authorization server that allows you to protect your endpoints in a productive environment.
Adding XSUAA Configuration –
Open the terminal and run the command cds add xsuaa
Adding XSUAA will make two changes – i) Adds XSUAA service to the package.json and ii) Creates XSUAA security configuration in mta.yaml file.
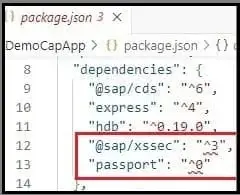
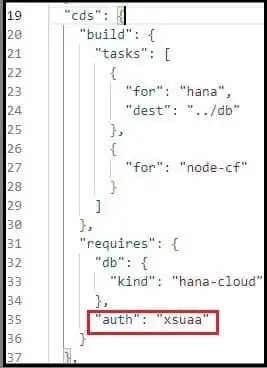
i) Changes in package.json file
a) It will add packages @sap/xssec and passport in the dependencies.
b) It will add authorization as xsuaa in requires section of CDS.
ii) Changes in mta.yaml file –
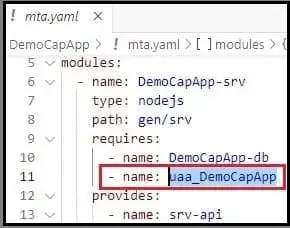
a) XSUAA service ‘uaa_DemoCapApp’ will get added in the requires section of srv and destination modules. Also service-key of XSUAA service ‘uaa_DemoCapApp’ will also be added.
b) In the resources section, a new entry is added for XSUAA service uaa_DemoCapApp where you can see details like service as xsuaa, service name, service plan etc.
Note– Observe the path, which is given to the xs-security.json; that means the xs-security file will act as a configuration file for XSUAA.
Also Enroll to »» Udemy course SAP BTP Training – From Basics to Advanced [Hands-on] to learn in detail about – Applying Role based Security to CAP Services, Generating Roles in xs-security file, Creating and Managing Role Collections, and Testing the Fiori Application using Postman.
Conclusion –
Congratulations! You have successfully completed the SAP CAP tutorial on Add Security to SAP Fiori Application with XSUAA and Approuter. You have learned about the Configuration of Approuter, xs-security file, Authentication, Authorization, and XSUAA Configuration.
Please feel free to comment and let us know your feedback. 😊
If you liked it, please share it! Thank You!
» Also check – Interview Questions & Answers…
• Top 20 SAP BTP Interview Questions and Answers
• Top 30 SAP CAP Model Interview Questions and Answers






Excellent, very useful…Thanks for writing this blog..