SAP Cloud Application Programming Model (CAP) is the programming model for business applications on SAP HANA Cloud and SAP Business Technology Platform (BTP). SAP CAP is used to develop new applications and extend existing SAP applications. The basic layers of CAP are CDS, SAP Fiori, Java/Node.js, and SAP HANA. With the CAP approach, we will use CDS to define models and services. JAVA and node.js will be used to handle custom logic and complex validations. Fiori apps built in CAP will be used to transmit events that other services can pick up and to receive incoming requests that can trigger services. And with CAP, we will create native HANA Cloud Database artifacts such as tables, views, functions etc.
The tool for creating the SAP Fiori application with CAP is Business Application Studio which is a development environment available on the SAP Business Technology Platform. So let’s start the SAP CAP tutorial series to create SAP Fiori Application with SAP CAP and SAP HANA Cloud.

Prerequisite–
1) To develop CAP applications in BAS and to deploy developed applications to SAP BTP Cloud Foundry Environment, you should have an SAP Business Technology Trial Account with a subaccount and a space. Refer tutorial How to Create SAP BTP Trial Account?
2) To create HANA Cloud Database artifacts and to power any SAP applications, you should create SAP HANA Cloud, SAP HANA Database instance. Refer tutorial How to Create SAP HANA Cloud Instance?
In Part 1 of the SAP CAP tutorial series to create SAP Fiori application with SAP CAP and SAP HANA Cloud, you will learn –
- How to launch SAP BAS
- How to create Dev Space in SAP BAS and how to configure it
- How to create your first Full-Stack CAP project in BAS
- How to make a CAP project development ready
- How to create Database Entities and Service Interfaces for SAP HANA Cloud
Let’s Create SAP Fiori Application with SAP CAP
Below is the step-by-step procedure.
1) Launch SAP BAS
a) Login to your SAP BTP trial account ( https://account.hanatrial.ondemand.com/ ) and click on ‘Go To Your Trial Account’.
b) In the trial account, navigate into your subaccount.
c) Inside the subaccount, expand ‘Services’ from the left side menu navigation and click on ‘Instances and Subscriptions’.
d) Click on ‘SAP Business Application Studio’ located under ‘Subscriptions’.

Note – In recently created trial accounts, SAP Business Application Studio is subscribed by default.
SAP BAS Trial will open in a new tab. If you have not created a dev space yet then the welcome page for SAP Business Application Studio will appear.

2) Create Dev Space in SAP BAS
a) On the welcome page of SAP BAS, click on ‘Create Dev Space’ (as shown in the above image).
b) Click on ‘Full Stack Cloud Application’ and enter the name you want to set for dev space.
c) Select the necessary SAP extensions you want to set for your dev space. For this project, we will select SAP ‘HANA Calculation View Editor’ and ‘SAP HANA Tools’.
d) Once necessary options are selected, click on ‘Create Dev Space’.

On the new screen, you can see dev space is in status ‘STARTING’. This process will take a few minutes to finish.

e) When Dev Space will show the green color status ‘RUNNING’ then click on Dev Space name. It will load the editor of BAS.

Now you will be navigated into your newly created SAP Business Application Studio Dev Space. Bookmark this URL so as to open your dev space directly in the future.

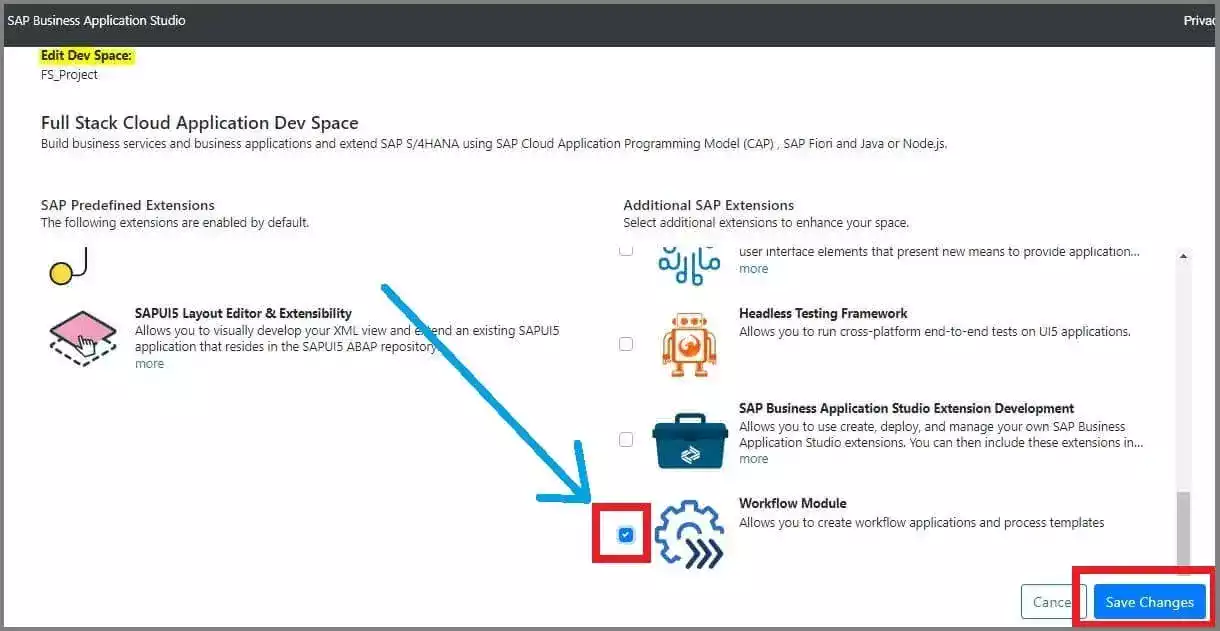
Note – You can change the ‘SAP Extensions’ of your already created dev space at any point in time. You can delete any existing SAP extension which is of no use or can add a new one.
For example, if you want to work on ‘Workflow Management’ then you can add the SAP extension ‘Workflow Module’. To perform this, follow the below steps –
i) Your dev space should be having ‘STOPPED’ status. If your dev space is in ‘RUNNING’ status then click on the ‘Stop’ button.

ii) This process will take 1-2 minutes to finish.

iii) Once the status is showing ‘STOPPED’ then click on the ‘Edit’ button.

iv) A new screen will open to edit the dev space. Make the necessary changes (add or delete) in the SAP Extensions. In this case, add the SAP extension ‘Workflow Module’ and click on ‘Save Changes’.
3) Configure the Dev Space
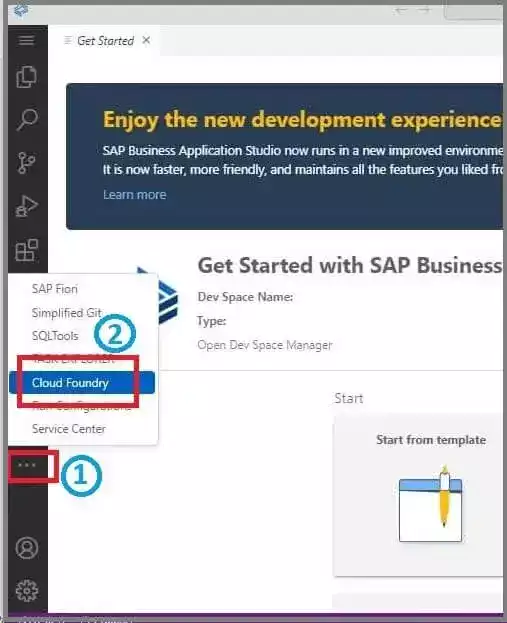
In the left sidebar navigation menu, hover the mouse cursor to find the ‘Cloud Foundry’ option. If it’s not visible there then click on three dots (as shown in the below image) and click on ‘Cloud Foundry’.
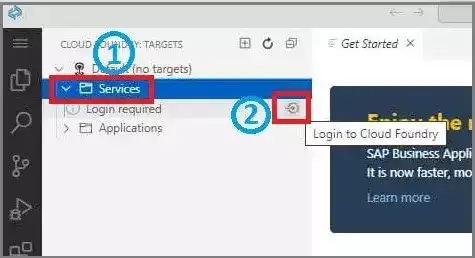
a) Now expand either ‘Services’ or ‘Applications’ and click on ‘Login Required’ to login to Cloud Foundry.
b) A cloud foundry sign-in window will appear which will display the ‘Cloud Foundry Endpoint’ and ‘Credentials’. Enter the email address you used to create your SAP BTP account and the password. Click on ‘Sign in’.

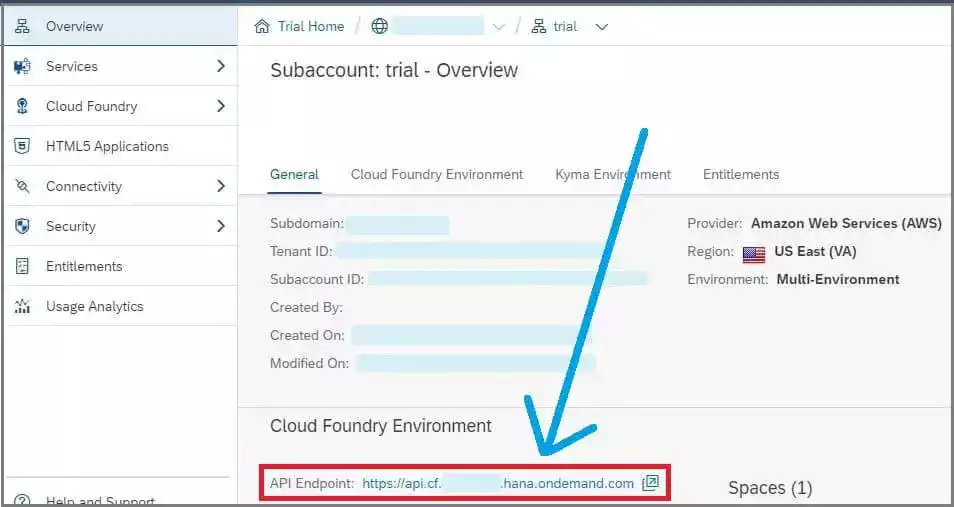
Note – The default value populated in the ‘Cloud Foundry Endpoint’ is not necessarily the correct value. You can confirm the value from the SAP BTP Cockpit at the Subaccount level.
c) On successful signing into Cloud Foundry, select the ‘Cloud Foundry Organization’ and the ‘Cloud Foundry Space’ from the dropdown. (You can check the name of the space from the subaccount overview level of the SAP BTP Cockpit.) Click on Apply to finish the process.
d) Once done, you can see services or application instances available under the space you selected.

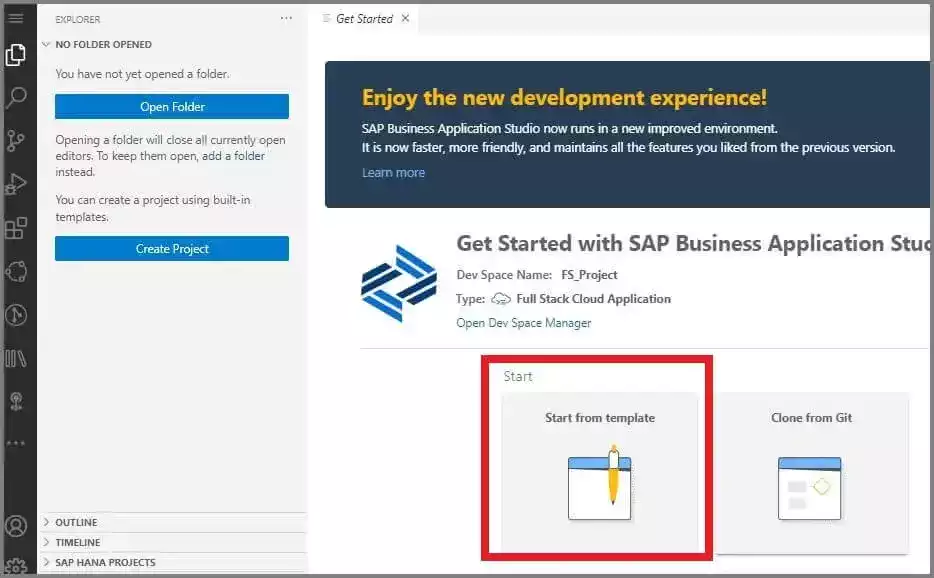
4) Create a new CAP project
Click on the left sidebar navigation menu –> Click on ‘Help’ –> Click on ‘Get Started’ (as shown in the below image).

On the new screen, click on ‘Start from template’.
A new tab will get opened within the SAP BAS editor. Select option ‘CAP Project’ and click on ‘Start’.
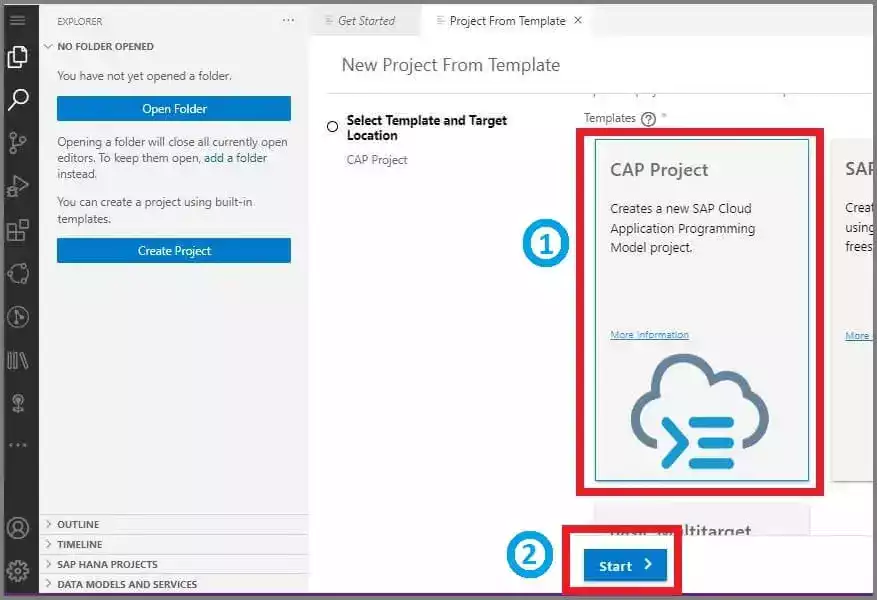
Enter the name of the project you want to provide to your CAP Project. Select ‘Node.js’ as the runtime. For the option ‘Add features to your project’, select the below checkboxes–
- CI/CD Pipeline Integration
- Configuration for SAP HANA Deployment
- MTA based SAP Business Technology Platform Deployment
Click on ‘Finish’.

» Also Read – Top 30 SAP CAP Model Interview Questions and Answers
5) Prepare CAP Project for Development
a) You can observe – i) generated artifacts for the newly created project as a Multi-target application (mta) with modules like ‘db’, ‘srv’, ‘app’ etc. ii) configuration files like mta.yaml files which is having parameters and dependencies for each module, and package.json which contains dependencies, CDS configuration details etc.
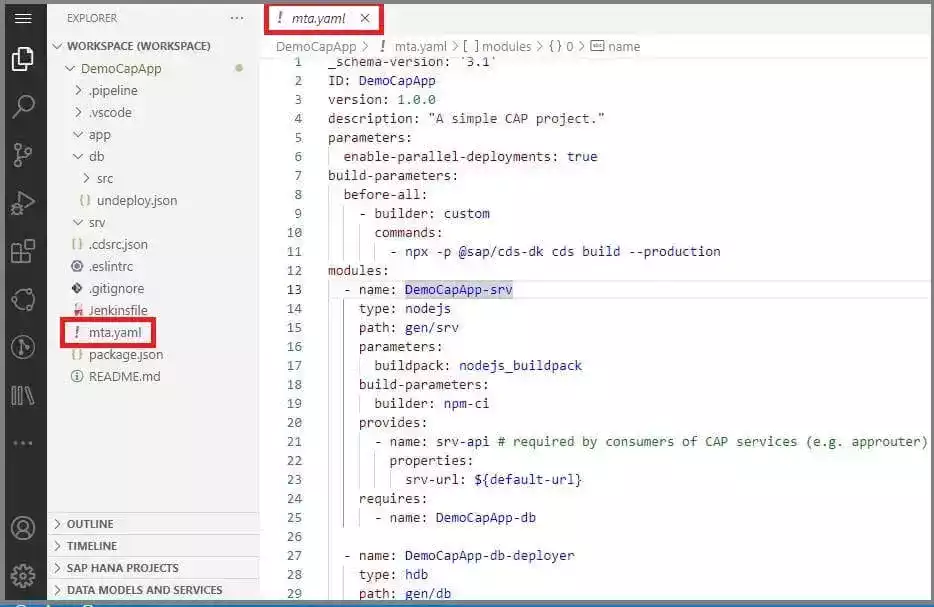
Note: In your generated mta.yaml, if the db module and resources are missing then open the BAS terminal (click on the left sidebar navigation menu –> click on ‘Terminal’ –> click on ‘New Terminal’). From the terminal, run the command cds add hana .
b) Perform the below steps to check if the generated project is fully configured to HANA –
1. In mta.yaml file –> inside database module –> change the path from gen/db to db

2. In the package.json file –> inside the cds section –> replace the existing cds section with below mentioned new code.
"cds": {
    "build": {
        "tasks": [
            {
                "for": "hana",
                "dest": "../db"
            },
            {
                "for": "node-cf"
            }
        ]
    },
    "requires": {
        "db": {
            "kind": "hana-cloud"
        }
    }
}
Note –
package.jsoncontains all details related to deployment and the information about modules (application or micro-services) and their dependencies with other micro-services.
c) Install Dependencies of package.json file –>
We need to install the dependencies for several modules available in the package.json file. Open a new terminal (click on the left sidebar navigation menu → click on ‘Terminal’ → click on ‘New Terminal’) and issue below mentioned commands.
1) Run the command npm install.

2) Generate package.json file in db folder → To deploy the generated database artifacts to SAP HANA Cloud, you need to have package.json file in the db module/folder. Package.json file will run the @sap-hdi-deply module.
Run the command npm install -g hana-cli
After installation, run the command hana-cli createModule
You will observe that package.json file has been generated in db folder (or database module)

5) Create DB Entities & Service Interfaces for HANA Cloud
The SAP CAP Model utilizes core data services (CDS) to define database artifacts in the db folder (or db module). Let’s create two tables for sales data as Sales Header and Sales Item. And create a service interface for those two tables. Follow the below steps to create database entities and service interfaces-
a) In the db folder, create a new file. Right-click on the db folder and click on ‘New File’. Give the name which you want to the file. Make sure to add .cds as a file extension.
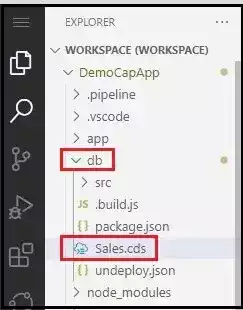
Add the below code in this new file.
namespace app.Sales;
type string_4 : String(4);

entity ZT_SalesHeader {
 key ID : String(10);
     DocCategory : string_4;
     DocType : string_4;
     SalesOrg : string_4;
     SItem : Association to many ZT_SalesItem on SItem.SalesDoc = $self;
}

entity ZT_SalesItem {
 key SalesDoc : Association to ZT_SalesHeader;
 key SalesItem : string_4;
     Material : String(10);
     MatType : string_4;
}
b) In the srv folder, create a new file. Right-click on the srv folder and click on ‘New File’. Give the name which you want to the file. Make sure to add .cds as a file extension.
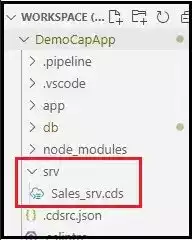
Add the below code in this new file.
using app.Sales from '../db/Sales';

service Sales_Service {
   entity ZS_SalesHeader as projection on Sales.ZT_SalesHeader;
   entity ZS_SalesItem as projection on Sales.ZT_SalesItem;
}
» Next Tutorial…
Creation of SAP Fiori Application with SAP CAP and SAP HANA Cloud – Part 2
Conclusion –
Congratulations! You have successfully completed Part 1 of the SAP CAP tutorial series on SAP Fiori Application creation with the CAP model and HANA Cloud. You have learned about the creation and configuration of dev space in SAP Business Application Studio, the creation of the CAP project in BAS and making it development-ready, and creating database entities and service interfaces for SAP HANA Cloud. In the next tutorial we will deploy the generated database artifacts into the HANA database and load data into it, and we will create the SAP Fiori application by consuming the CAP service entities.
Please feel free to comment and let us know your feedback. 😊
If you liked it, please share it! Thank You!
Also Enroll to »» Udemy course SAP BTP Training – From Basics to Advanced [Hands-on] to start your SAP BTP Cloud journey starting from the BTP concepts to the Development of Full-Stack Fiori Applications with CAP Model & HANA Cloud.
6 thoughts on “Create SAP Fiori Application with SAP CAP and SAP HANA Cloud – Part 1”